![HOW DO I GET STARTED WITH INTERACTIVE WHITEBOARDS IN THE MUSIC CLASSROOM? [FREE GUIDE]](https://nottelmannmusic.com/wp-content/uploads/2018/11/How-do-I-get-started-with-IWBs_600.png)
HOW DO I GET STARTED WITH INTERACTIVE WHITEBOARDS IN THE MUSIC CLASSROOM? [FREE GUIDE]
Curated from Midnight Music – by Katie Wardrobe –
What exactly does an IWB do? What’s so special?
It’s a fancy presentation tool
At its heart, an interactive whiteboard (IWB) is simply a fancy presentation tool.
Great things:
- It allows you to get out from behind a desk when teaching your class
- It usually comes with interactive presentation software which you can use to make fantastic resources (it’s like Powerpoint on steroids)
- You can bring students up to the board to contribute to the lesson
Negatives:
- Only one person using the technology at a time (in most cases)
- They are expensive to purchase
- There’s a learning curve involved if you’re new to IWBs and you want to get the most out of it
I have an IWB – how can I use it effectively?
Not just for showing Youtube videos
First of all – make sure you actually start using it! Clear the space in front of the board so that you and your students can walk up to it and touch it. You’d be surprised at how many times I’ve seen desks, chairs or other classroom furniture positioned under the board!
Everytime you are showing students something on your computer, stand in front of the board and operate the software or website by touching the IWB, instead of sitting at your computer behind the desk.
Think of your finger as being the mouse, or imagine the IWB as an enormous touch screen – just like your iPad. It takes a little while to get used to but it’s worth persisting.
Using the IWB regularly is a habit you need to get into. Students can help too – ask them to step up to the IWB and take turns navigating the software or website. After a couple of weeks you’ll probably wonder how you did without the board in the first place!
Tip: if you work with young students who are not very tall, you might like to get a wide step for them to use to reach up to the board.
4 basic ways you can use your IWB
- Open your favourite music software (such as your notation software or digital audio workstation) and create compose a piece of music with the class
- Use it to show interactive music websites like Groove Pizza, Incredibox, Beepbox, Chrome Music Lab or Isle of Tune (there are many others!) and get the students involved with creating
- Use the IWB software to create your own interactive music resources, or buy pre-made resources from places like Teachers Pay Teachers. Use the resources to teach, engage, quiz, demonstrate and reinforce musical concepts.
- And of course, you can also show Youtube videos and non-interactive websites
Should I buy an IWB if I don’t already have one?
A few considerations
I’m going to be completely honest here. If you don’t already have an IWB I’m not convinced that spending your tech budget on an IWB is the best use of your money.
You need to examine your technology and learning goals here.
If your aim is to buy tech resources that allows students to get hands-on with technology to create, compose and learn (and those would be my primary goals) I would suggest you prioritise the purchasing of multiple individual tech devices like iPads or Chromebooks. Even a small number of iPads or Chromebooks would allow for greater hands-on technology usage for your students than a single IWB. After that, I would be looking at spending tech money on a few microphones, MIDI keyboards, headphones, speakers, cables and so on.
If you are already set up with hands-on tech options for students, and you still have money to spend then you might like to consider an IWB purchase for your classroom.
Lastly, if you already have an IWB or you’ve inherited one, then great! There are many ways you can use it in your classes and you should definitely take advantage of the benefits an IWB can offer.
Which IWB should I buy?
Be a sheep…!
There a many IWBs on the market. Two of the most popular are SmartBoard and Promethean boards. MimioBoards, Hitatchi Starboards and a range of other brands are also used in schools.
Personally, I would recommend choosing Smartboard or Promethean if possible simply because there are LOTS of users in the world – including many music teachers – and it’s much easier to find help and ready-made resources when you need them.
Smartboard and Promethean brands have also been my favourite to use in the many schools I’ve visited for workshops due to their features, functionality, ease of use and in particular, the software.
Mounted or portable?
In my experience, life is better with an IWB that is mounted to the wall. Although this means you can only use it in one position in your classroom, you will suffer much less heartache than you would dealing with a portable board that needs constant calibration. Portable boards also have many loose wires and can get in the way at times.
Which apps and websites work well on IWBs?
Really, any software app or website will “work” on an IWB. Some simply work better or more effectively and some are designed specifically with IWBs in mind.
Below are just a FEW suggested options. If you have a favourite website or app that you love to use in your classroom, give it a go on your IWB and see if you like the way it works .
Creative interactive music websites
Here are a few creative music websites and apps that work well on an IWB. All of these ones are FREE.
- Incredibox
- Groove Pizza
- AQWERTYON
- Isle of Tune
- Beepbox
- The Chrome Music Lab – all 13 “experiments”!
Related resources and further reading:
- The Ultimate Free Music Tech Resources Guide
- Free lesson plan – Teaching Beatboxing Basics with Incredibox
- 50+ Lesson Ideas For The Chrome Music Lab
- Website of the week: Isle of Tune
Notation
Notation software can be a little “fiddly” on an IWB sometimes, but it’s still worth giving it a go. You can use it to compose and arrange with your class as a group – at the board. It’s great for students to see:
- Online notation software: Noteflight or Flat.io
- Desktop notation software: Sibelius, Finale, Dorico, Notion
Related:
Theory, Ear-Training and Literacy
- Auralia (ear-training)
- Theta Music Trainer (ear-training)
- Musition (music theory)
- MusicTheory.net (music theory and ear-training)
- Staff Wars (reinforce notes of the staff)
Related:
Making your own IWB presentation resources
Why make your own IWB presentation files?
Creating an interactive digital presentation using your IWB has SO many benefits:
- All your text, images, videos, music and other digital resources are in one single place for your lesson
- Everything is in the correct order to run your lesson smoothly
- You can make it engaging and fun by adding interactive elements
- You can take advantage of inbuilt formative assessment tools like polls and quizzes
- It’s easy to save multiple copies of the file for different classes
- You can reuse the file across multiple class groups and year after year (with only minor adjustments required)
Before you make something from scratch…
It can be time-consuming when you start from scratch, so you might like to see what’s available to download for free, or purchase online before you launch into making your own resources. There are a number of music teachers that share SMART Notebook and Promethean ActiveInspire files online, but don’t forget that non-music specific IWB files can also be useful if you can adapt them for your music classroom.
Things you can do:
- Visit Teachers Pay Teachers and search interactive whiteboard resources (under Resource Type). You can narrow your search by selecting Music from the Subject Area list. Note that there will be a mixture of resource types in the search results, including Powerpoint files, PDFs, SMART Notebook files and more
- Visit the website of your IWB manufacturer and check to see if there is a resource sharing area. Some teachers share their files so that other teachers don’t need to reinvent the wheel
- Start a swap/share group with music friends and colleagues
- Post in one of the many music teacher groups on Facebook to see if anyone has files they would like to share
- Search for music teacher blogs and websites that have shared IWB resources and links (see list below for a starting point)
Useful places to find ready-made IWB files and other resources:
- Teachers Pay Teachers – Cherie Herring
- Teachers Pay Teachers – Aileen Miracle
- Teachers Pay Teachers – Lindsay Jervis
- Cherie Herring shares lots of lessons on her website and also has a separate tech integration site with tips and tutorials
- The Kodaly Aspiring Music Classroom blog
- Mrs Friedman’s Resources and also on this MusicTech wiki
- Ashley Queen’s Elementary Music Resources
- Amy Burns has a big list of IWB resources here on her website
- Amy Burns is also the author of the free ebook Help! I’m An Elementary Teacher With An Interactive Whiteboard
Creating your own files – some tips
The IWB software is essentially presentation software – like Powerpoint or Keynote – but it usually has some extra bells and whistles. It’s easy to become overwhelmed by all the fancy features available to you, so my advice is to start simple.
A few tips:
- You don’t need to be standing at the board itself to create your files. In fact it’s easier to create your resources when you’re away from the board, working on your laptop
- Gather all the content you need and put it into a folder so that it’s easy to find. This includes things like background images, notation images, other pictures, audio files, videos, chord diagrams and text
- Set up a template file in the software with your chosen colours, fonts, background images and basic formatting BEFORE you start building your lesson materials into the file
- Limit your file to a small palette of colours – just 3 or 4 – gives a much more cohesive look
- Test out your resource at the board itself to get a feel for whether it works well (or not!). Check any links you’ve included, try out the interactive features and proofread the text
The 5 basic skills you need to learn to create your own resources
Yes – there are only 5 basic skills you need to learn!
- How to create and format text
- How to add and format a shape or line
- How to add an image (includes photos, icons, notation images, chord diagrams)
- How to hyperlink text or an image
- How to embed an audio file or video
When you know how to do those 5 things, you can create a huge variety of resources.
Applying the 5 skills: some easy examples
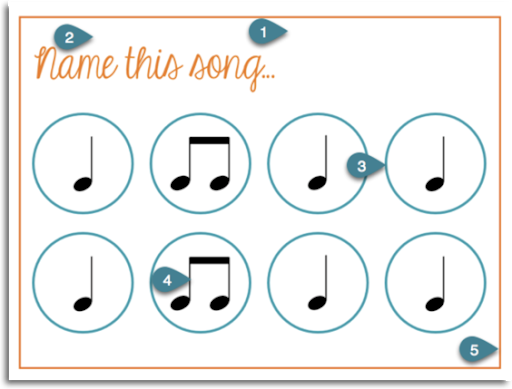
“Name This Song” example:
- Start a new blank slide
- Add a text object to create the title
- Add shapes (the circles), make them “no fill” circles and adjust the colour and line thickness
- Add notation images to the slide, resize them if necessary and position them inside the circles
- Optional: add a border by creating a rectangle shape on the slide. Make it a “no fill” shape and adjust the line thickness and colour
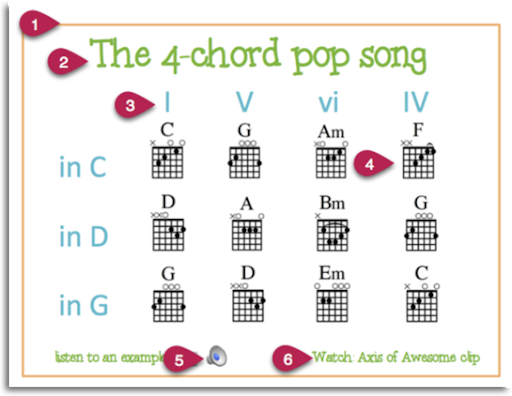
Chord Chart example:
- Start a new blank slide
- Add a text object to create the title
- Add more text objects to create the I, V, vi, IV, the “in C”, “in D”, “in G” and the “listen to an example” and “Watch Axis of Awesome” text
- Add chord diagram images to the slide, resize them if necessary and position them
- Select the “Watch Axis of Awesome” text object and create a hyperlink. Link the text to their Red Nose Day performance of the 4-chord song medley on Youtube (it’s the clean version with no swearing)
- Embed an audio file: find an example of a 4-chord song and attach the audio to the slide
- Optional: add a border by creating a rectangle shape on the slide. Make it a “no fill” shape and adjust the line thickness and colour
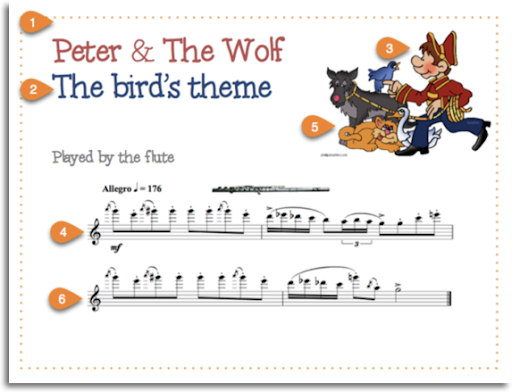
“Touch the notation image to listen” Peter and The Wolf example:
- Start a new blank slide
- Add text objects to create the title, subtitle and “played by the flute” text
- Add a Peter and the Wolf clip art image
- Add the notation image
- Create a hyperlink – link the Peter and the Wolf image to the DSO Kids information page about Prokofiev
- Embed the audio file of the Peter and the Wolf bird theme on the slide
Download step-by-step instructions
I have step-by-step instructions on how each of the 5 basic skills work in different software programs, plus instructions for creating the examples above which you can download at this link:
Tutorial: Learn Just 5 Tips To Create Your Own Awesome Resources – download your copy
Once you’ve mastered these skills you’ll have a good understanding of how to create engaging, interactive IWB resources. You can then build on those skills and learn some of the other “fancy” tricks in your software.
Places to find images and fonts
A few super-useful resources:
- The Big Free Music Notation Image Library
- Free Guitar Chord Diagrams for Music Teachers
- Free Ukulele Chord Diagrams for Music Teachers
- My favourite place to find free (public domain) images is Pixabay
- Fonts: there are lots of cute, pretty, funny, descriptive fonts available online. You can find some great free ones at DaFont
- Music fonts: here are 5 music fonts that I’ve shared in the past
- Icons: I LOVE icons since they can communicate simple ideas quickly. Take a look at the icons at Flat Icon (try searching for “music”, “instruments”, “audio” and so on)
Download a copy of this guide
Would you like to take a copy of this with you? Click on the download button below and we’ll send a copy straight to your email inbox. You’ll also receive weekly music tech tips and news (if you don’t already). You can unsubscribe at any time.