
Curated from Midnight Music – by Katie Wardrobe – Even the music teachers most experienced with Zoom will learn something new in Katie’s complete article on Zoom for music educators. And we DO mean COMPLETE!
– Intro –
When using Zoom to run music classes, there are a few settings you can adjust to enhance the experience for you and your students.
Here is a summary of the settings you should consider.
First check for updates
Check that Zoom is updated to the latest version:
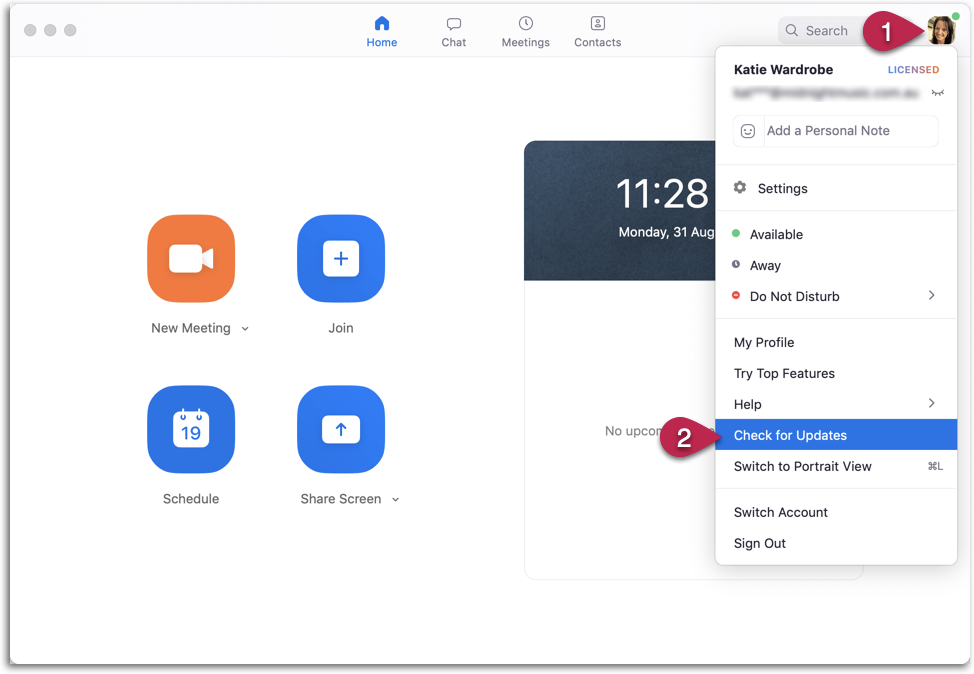
- Click on your profile picture
- Select Check for Updates
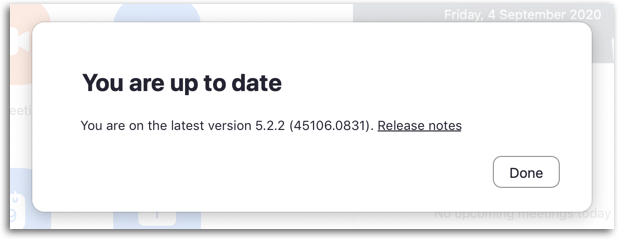
A message will show letting you know that you either are up to date, or that there is an update available.
Optimal setup
To get the best results, the following setup is recommended.
Please note that these suggestions are not absolutely mandatory but they will give you the best results and allow you to take advantage of the advanced audio settings below.
- Connect to your network via an ethernet cable instead of using wifi. If you are unable to do that, locate your computer as close as possible to the router. It’s also ideal if there are no walls between you and the router. If that’s not possible, you might consider a wifi repeater or extender which will extend the coverage of your wifi network
- Use wired headphones
- Use the best quality microphone you can – anything that is a step up from the in-built microphone on your laptop. One option is to use a USB microphone which plugs directly into your computer. You’ll achieve even better results with more professional equipment such as audio interface with a mic plugged in
Adjust audio settings
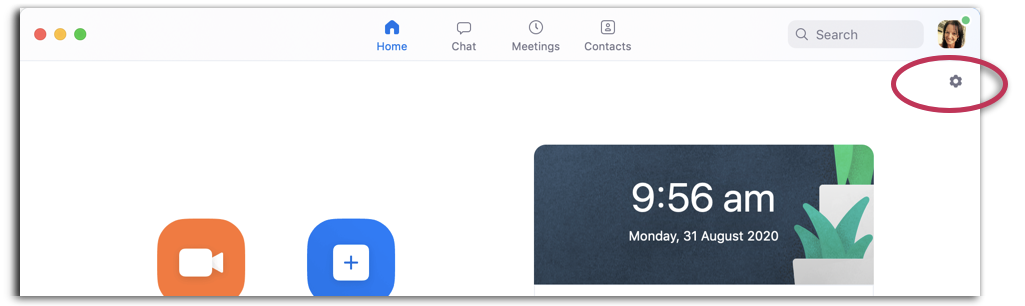
On your Zoom desktop client, open Settings by clicking on the cog.
You can also click on your profile picture and choose Settings from the drop-down menu.
Settings to choose
Next, do the following (see page 10 for an explanation of “why”!):
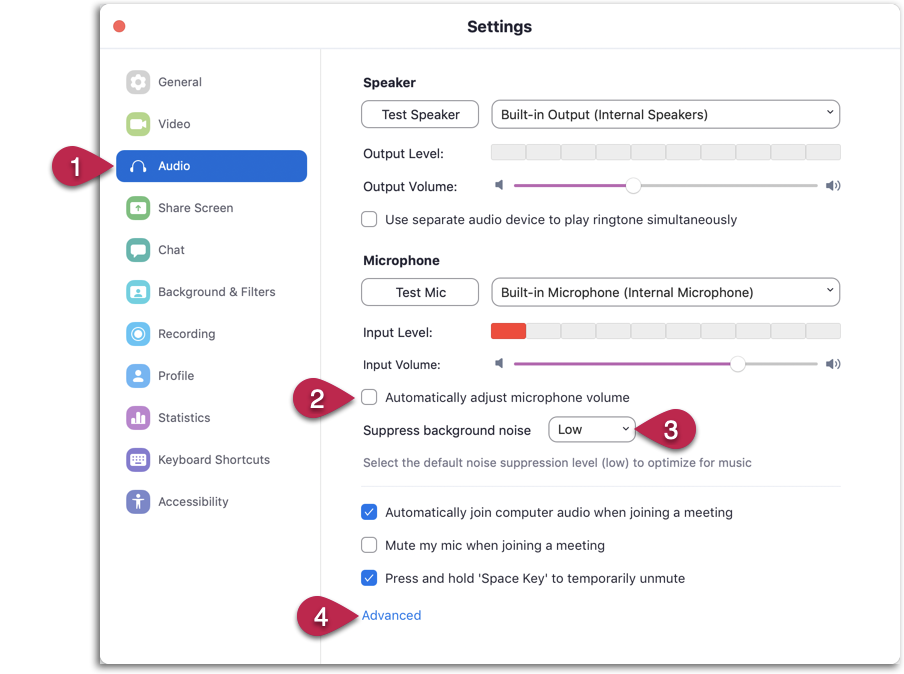
- Click on Audio in the menu on the left
- Uncheck Automatically adjust microphone volume
- Set Suppress background noise to Low
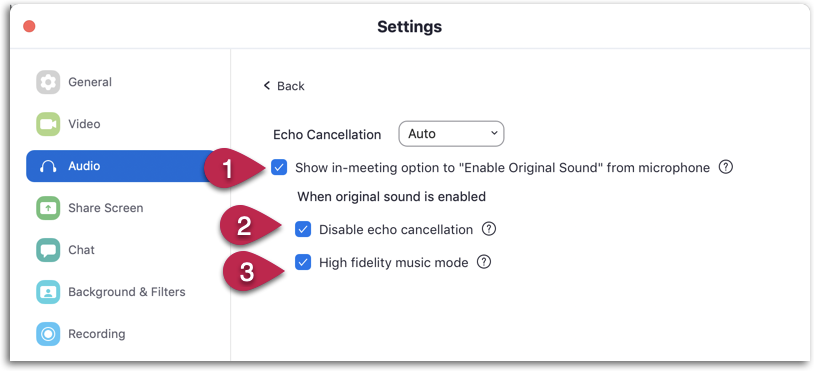
- Click on Advanced
On the Advanced settings page do the following:
- Check the box next to Show in-meeting option to “Enable Original Sound” from microphone
- Check the Disable echo cancellation box*
- Check the High fidelity music mode box**
*note: the Disable echo cancellation option works best with headphones and a decent quality microphone
**note: the High fidelity music mode increase CPU utilization and consumes greater network bandwidth so it will not suit everyone
Do I need to adjust the above settings every time I run a lesson?
In my experience, the settings you have adjusted in your Zoom desktop client will remain this way until you decide to change them.
Any time you update Zoom, I think it’s wise to double-check the settings again to make sure everything is still working the way you expect it to.
Before and/or during each lesson
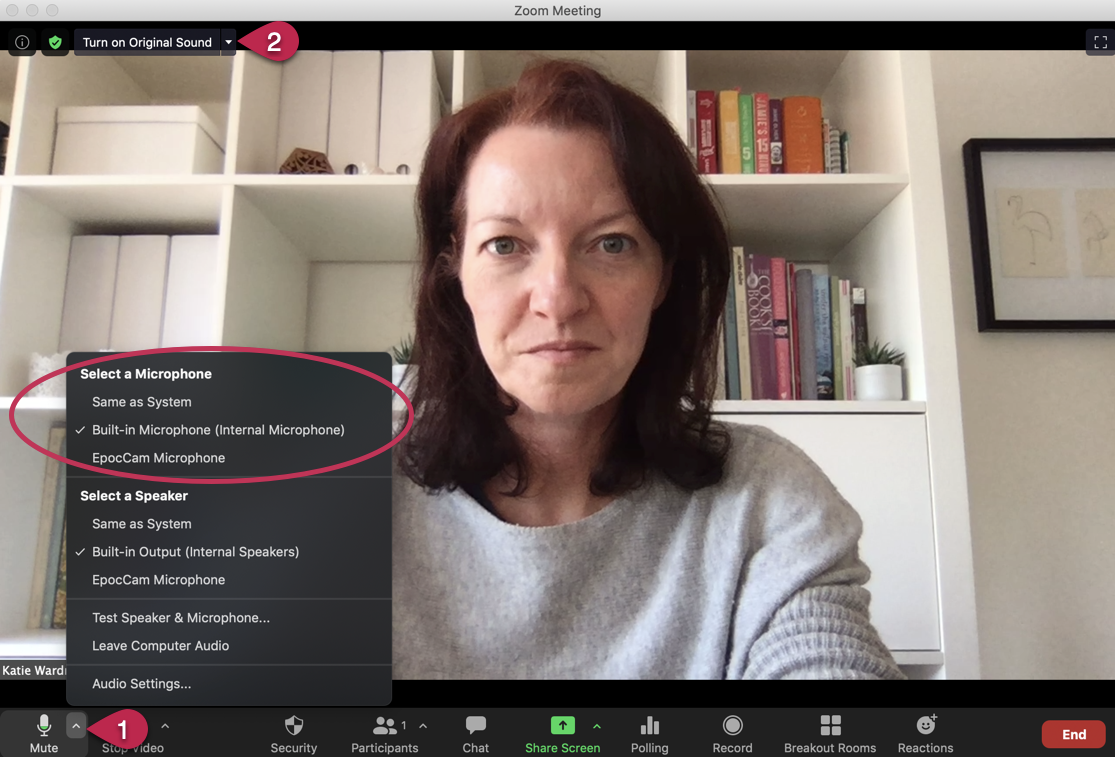
When you have started your Zoom meeting, check the following before the lesson starts:
- Check your microphone is selected
- Click on the Turn on Original Sound button at the top of your screen to utilize the advanced audio settings we just activated in the previous step. If you will be singing/playing this option preserves the sound from your mic and overrides Zoom’s echo cancellation and audio enhancements. It can be turned on/off during the lesson as needed
Allow your students to utilize Original Sound
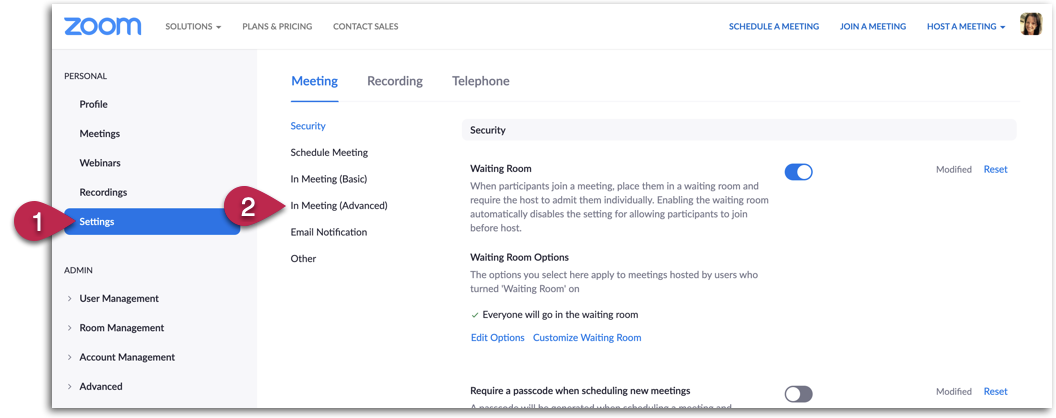
If your student/s will be playing or singing during the lesson it’s a good idea to have them utilise the Original Sound at their end so that you can hear them clearly. You will need to enable that option in your Zoom web portal first. Log into the Zoom website and then do the following:
- Click on Settings in the menu on the left
- Select In Meeting (Advanced) in the sub-menu to jump to the advanced meeting settings area (or scroll down…down….down)
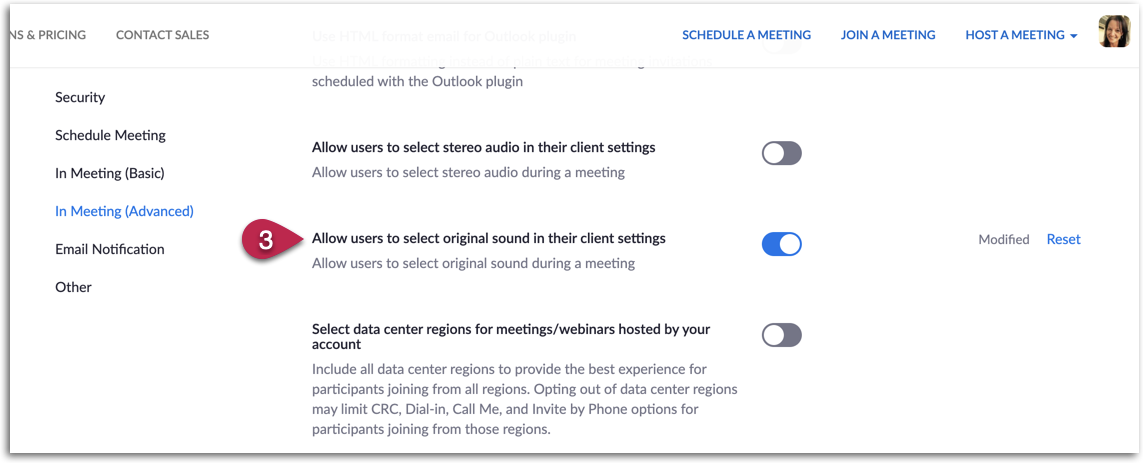
- Locate Allow users to select original sound in their client settings and turn it on
You will then need to direct students to turn on this setting during your lesson.
Sharing audio from Youtube video, a music website or software application
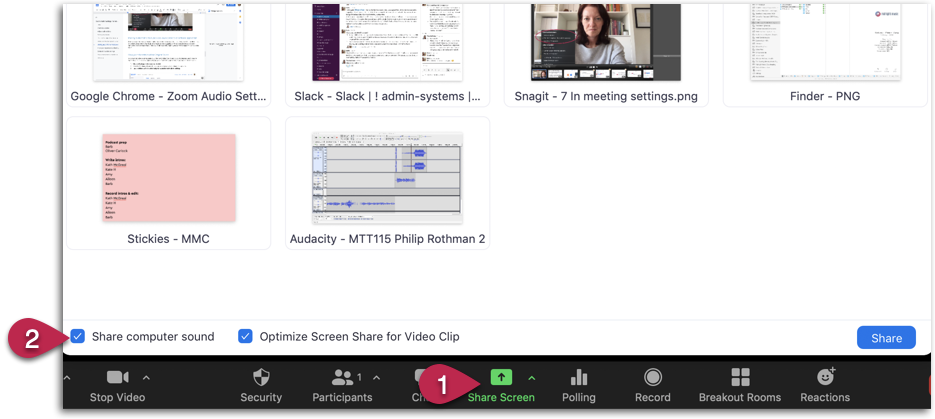
When you want to share a Youtube video, interactive music website or app or a music software application that’s installed locally on your computer there are some specific settings in the Share Screen area that you should be familiar with.
If you want students to hear the sound of the video, website or software application you’re showing, then you need to check the Share Computer Sound option in the Share Screen window. This will ensure the audio can be heard with decent sound quality. If you don’t turn this option on, students will either hear:
- nothing at all if you have headphones on
- tinny, patchy, quiet sound because they are hearing it “second hand” via your microphone
To allow student to hear the audio at a decent quality, do the following:
- Click on Share Screen
- Select Share Computer Sound
- Play the video, or share the music website or application
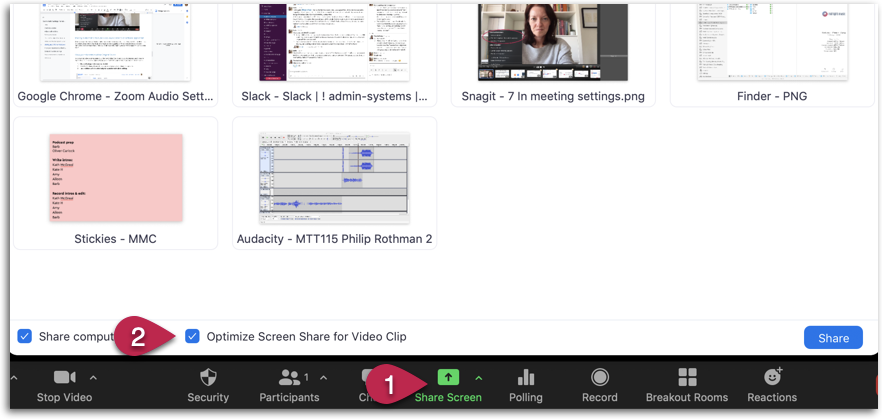
Optimizing Screen Share for a video played in full screen mode
This option is for enhancing the playback quality (ie. the visual aspect) of a video that you are sharing. This setting only applies to videos that are shared in full screen mode. If you are not sharing a video in full screen mode, it’s best to leave this turned off.
To share a video in full screen mode:
- Click on Share Screen
- Select Optimize Screen Share for Video Clip (check the Share Computer Sound option as well if the video has sound that you need to share)
- Start playing your video in full screen mode
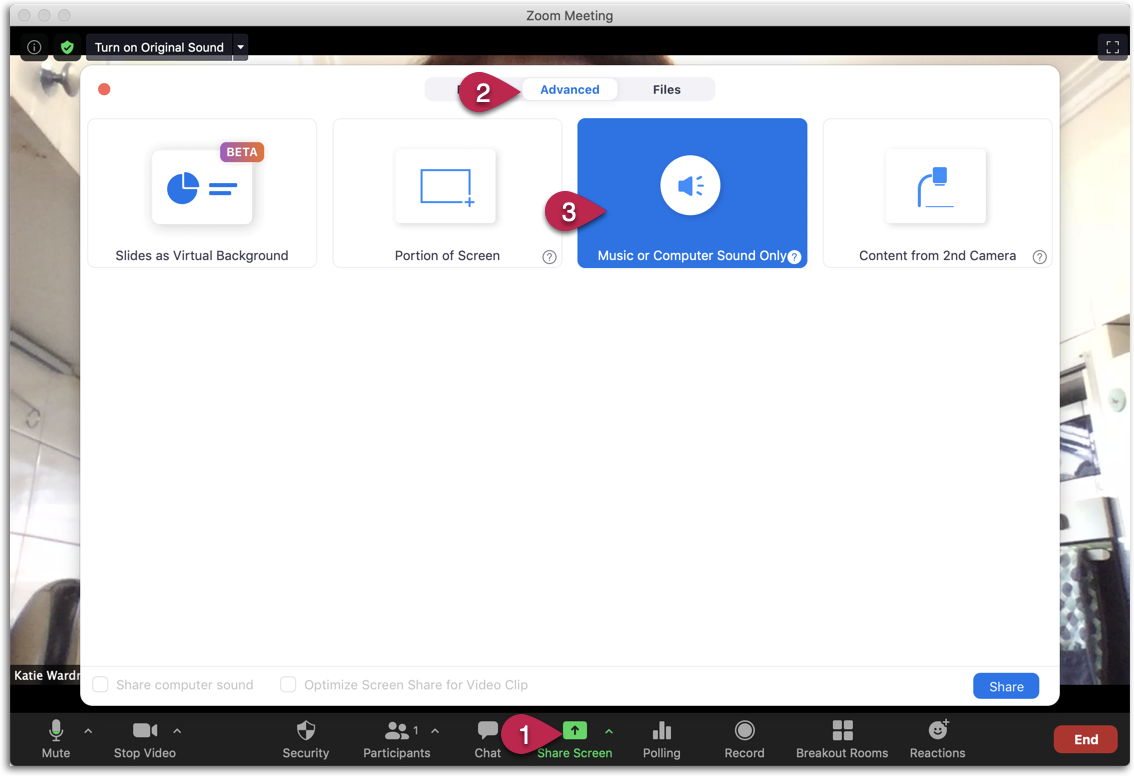
Sharing audio only – play along tracks
If you only need students to hear an audio file (such as a, sing-along or play-along track) while they still see you on the screen, you can do the following:
- Click on Share Screen
- Click on the Advanced tab
- Select Music or Computer Sound Only
Explanation of the settings
Why did we just change all those settings? Here’s a run-down on what they mean:
- Automatically adjust microphone volume:
This setting will automatically make your microphone softer or louder as needed to “even out” (normalize) the volume of your voice (or your singing and playing!) for your participants. In a music lesson the volume levels of you, your instrument and your singing can vary greatly and if you leave this setting on you may find that you have issues with your audio fading in and out. For this reason, it’s usually best to turn this setting off for music lessons.
- Suppress background noise:
Zoom has an inbuilt noise suppression function, which can “help” remove distracting noises that can be picked up by your participants’ microphones. For people using Zoom for its original intended function – ie. running regular meetings that involve speaking only – this includes things like paper crunching, keyboard typing, fan noise, the dog barking and so on.
However, this feature can be a disadvantage when running a music lesson because the soft low notes played on a cello can be interpreted by Zoom as unwanted background noise and it will work to eliminate it.
There are 4 background suppression options you can choose from in Zoom: autio, low, medium and high. The best option to choose for music lessons is the Low option which means that Zoom’s noise reduction will be minimal.
- Enable original sound (advanced settings):
This function allows you to preserve the sound from your microphone. It will disable Zoom’s inbuilt noise suppression, remove high pass filtering and remove automatic gain control. You can turn the Enable Original Sound setting on or off as needed while your Zoom session is running.
Generally, it’s good to leave it on while you’re playing or singing and turn it off if you’re just speaking. If you’re doing a combination of playing/singing and speaking (which is most music lessons!) then it’s fine to leave it on for the duration of the lesson
- Disable echo cancellation (advanced settings):
This disables Zoom’s automatic echo cancellation. If you check this box, it’s important to use headphones and a decent quality microphone to get the best result.
- High fidelity music mode (advanced settings)
Turning on this setting optimises Zoom for highest quality music. It’s important to know that this setting can increase your CPU utilization so if you are using a computer that struggles at times, you might find that it doesn’t work well for you. It can also consume greater network bandwidth and for that reason it is recommended that you connect your network via an ethernet cable instead of using Wifi.
Reference
Zoom support articles:
- How to check your version number
- Background noise suppression
- Enabling original sound
- Optimizing a shared video clip in full screen
New features: