
3 Simple Steps to Digital Badging in Music Education
Curated from Midnight Music – Katherine Miller and Alison Capelle –
Looking to motivate your music students? Kids of all grade levels will KILL for recognition like this!
Many of us are getting a second chance at rethinking how music education can look and sound as we head into the school year. Last spring provided us with virtually no time to have a good plan. Now, we can look back and learn from the experiences we had. As they say, second time’s a charm!
One of the biggest challenges we faced in switching to virtual learning last spring was student engagement. With songs, technology, instruments, games, and dances, engagement seemed to come naturally to students in our music rooms. Once we were required to provide that same music education from our own homes, it was discouraging to see how many students were missing out. Student engagement is something we want to be able to improve on during our second chance.
Music educator, Shawna Longo, provided the inspiration we were looking for during her presentation at the Music Ed Tech Conference this summer. During her presentation titled “Technology to Support the General Music Classroom”, she discussed some of her greatest successes from last year. One of her successes was curricular planning. It was her goal to get students excited and engaged in assessment. She did that by creating badges for her students to earn. That excitement and engagement is exactly what we wanted for our students, too! In fact, we had even dabbled in badging in years past. We did this by using the achievement feature in Blackboard 9 with our 4th grade recorder students. At the time, students could earn an achievement, or digital badge, for completing each learning module we created. A digital badge is like a digital sticker. It’s a great way to motivate your students by gamifying your lessons, and awarding small achievements. To learn more about digital badging, you can visit Digital Badging in Music Education: What, Why and How!.
Although it might seem kind of silly, students were motivated to collect and share their badges with others. They wanted to continue working to earn more and more. They also took ownership of mastering the skills they needed to earn the next badge. For all of these reasons, we decided digital badging might be the catalyst that would help students be engaged, motivated and achieving this coming year in our classrooms.
Here are the 3 simple steps we are taking to use digital badges and, hopefully, increase student engagement this year.
The 3 Simple Steps…
Step 1: Plan Out the Badges
Before you begin to create, it is important that you have a plan for your digital badges. In other words, what accomplishment, skill or quality are you trying to support by digital badging? For instance, you could set up your badges as a measure of students’ mastery of content standards. Badges could also be set up as an indicator of completing tasks. Or, badges could be set up as a way to help promote behaviors or skills that you would like to reinforce with your students.
In our case, we are really hoping to increase student engagement right away. We want students to be successful and earn badges pretty easily to start with. We want students to connect with us online, so that is a badge! We also want students to be able to turn in work remotely, so we made that a badge, too! By starting with simple learner behaviors, we are hoping students will quickly be engaged so we can up the risk later.
No matter what your plan may be, it is important to make your digital badges support your purpose.
Step Two: Create Badges
After you have planned what your badges will be, it is time to get creative! Each badge you have planned will need a digital image to represent it. This image is what the students will earn.
There are several ways you can go about creating digital badges for your classroom. If you are not comfortable with creating online, a great, FREE resource to start with is thenounproject.com. This website is a collection of royalty free icons. You can search for an icon by typing a word into the search bar to locate relevant images. Once you have found one you like, it can be downloaded onto your computer and then uploaded to your digital badge platform.
If you are looking to get a bit more creative, you can always create your own digital badge icon in Google Drawings. Here is an example of a badge we created for our students to earn if they attended a live lesson while learning virtually. We simply found an image that fit our badge theme and imported it into Google Drawings. We finished the badge by adding a colored frame in the background to make it stand out.
You can also create your own badges in Canva. Canva is a design website that helps you create amazing designs with ease. To make our badge images in Canva, we began by searching through a variety of badge logo templates available on the website.
Once we found a design we liked, we just edited the colors, text and background to fit our needs. For example, we created this badge students can earn for accessing their online lessons in Quaver Music from one of the ready made templates they had available.
If you’d like to learn more about creating your own digital badges using Canva, it’s covered in Module 3 of the popular Create Beautiful Teaching Resources Online course.
Step Three: Choose A Platform
Once you have created your digital badge images, you need to choose a platform for how your students will access their badges. We explored two great but very different options!
Badge Tracker on Flippity.net
The first option is a free template we found for digital badges on flippity.net. This website provides a template to easily turn a Google spreadsheet into a badge tracker students can access by clicking a link. All you need to do is open the template in Google Sheets and follow the instructions. The instructions will walk you right through the process of inputting your own specific information. Here is our example of the digital badge template Flippity uses with our information inputted into the columns.
We entered in our students’ names, the badges they could earn and the link to the digital badge icon we created in Step Two. Be aware, that any image that you create for a digital badge does need to be a URL link in order to work in the Flippity template. Here is a tutorial on how to get a URL link for your badge image using Google Drawings.
We really liked that badges in Flippity can be earned multiple ways. If a student earns a badge, you simply put an X in the column for that badge and it will show up on the Digital Badge Page for your student to view.
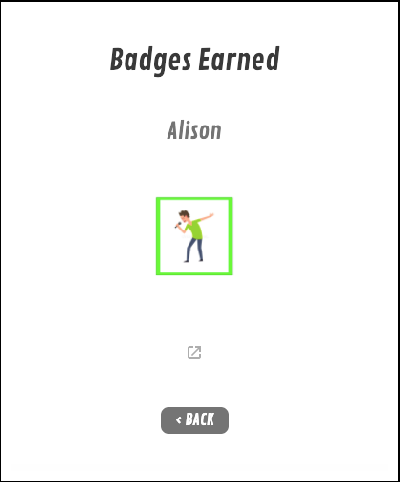
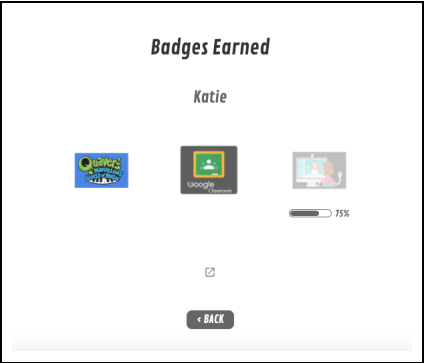
Flippity also allows you to show a badge that is in progress. If a student is 75% done towards earning a badge, you can show this by entering a fraction of ¾ or the corresponding decimal (in this example .75) into the Google spreadsheet instead of an X.
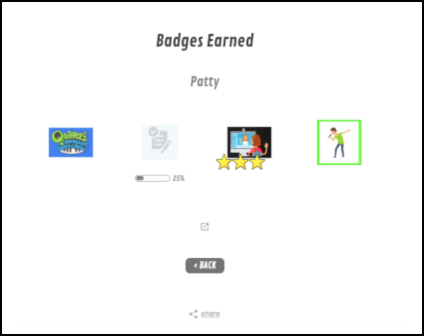
Another neat feature the badge tracker offers is a way to earn the same badge multiple times. This is done by simply placing an asterisk sign next to the X in the column for that badge. You could also use this feature to encourage students to increase the quality of work by giving more stars for more complete or superior work. Using asterisks in the template from Flippity will display like this.
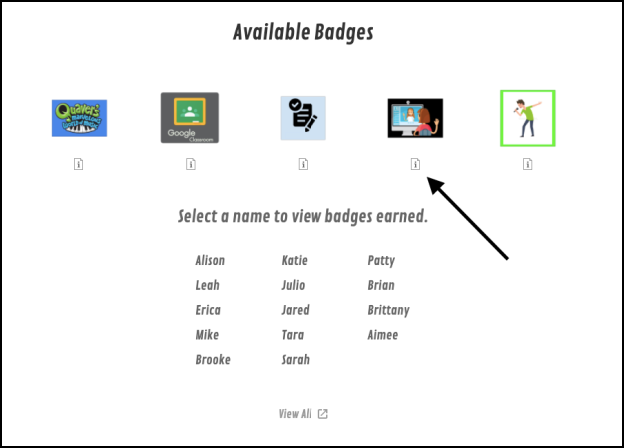
Lastly, we also liked that there can be an explanation of how students earn a particular badge included right on the badge page. The explanation can be seen by students by clicking the information button located under the list of badges.
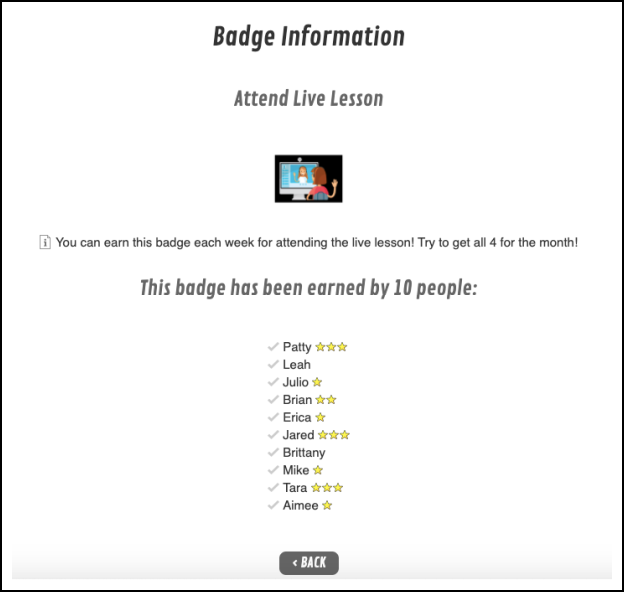
One limitation we saw is that you cannot make different badges available to certain students. For instance, it might be nice to be able to differentiate badges based on the need of the students within your classroom. The only work around we could see was to use a separate template for select students if you wanted to have different badges available to them.
Google Docs Badge Board
The second option we explored was using a table on Google Docs to create our own badge board. Creating a doc allows students easy access to our digital badges by just clicking a link, much like the ease of accessing the badge tracker on flippity.net. Be aware: When you share the Google link to your document, you should make sure that your privacy settings allow anyone with the link the ability to VIEW ONLY.
The setup for your Doc is completely up to you. You can begin by going to Insert—>Table and choosing the size that would be most appropriate. From there, you can format the text, border, and size of each row/column in the table. In our example, we even inserted a fancy heading that we created in Google Drawings.
We really liked that badges in Google Docs can be displayed however we wanted them to be! We could add the badge images that we created in Step Two to all students, or just some of them. In our example, we did this by adding each badge image to the second column of the table and doing a lot of copy/paste until each student’s badge options were complete. To show students that they had not yet earned a badge, we used image options to gray out each badge image. Once they earn the badge, we can simply go back into the image options and reset the color. Here is a tutorial on how to adjust the color of any image. We can further customize a badge board in Google Docs by creating a separate board, or doc, for each student. This might be useful if you did not want students seeing how others in the class are performing.
Like the badge tracker on flippity.net, there are some limitations to creating a badge board of your own. For instance, if you created a badge board for each student you would have lots of different documents to manage any time you were awarding badges. If you do decide to have just one board for an ensemble or class, that board can get pretty long! Even our example (which included just 7 students), filled up an entire page since the images need to be large enough to see. Another thing to consider is the badge board we created did not allow us to show student progress towards a goal or badge. We also did not have an easy way to include instructions to students on what they needed to do to earn each badge.
No matter what your goals are for the year, digital badging might be a great solution to see greater student achievement and motivation. We are hoping that by planning, creating and using digital badges with our students we will see more student engagement as we head into the new school year! Have you tried badging with your students before? We would love to hear your tips and tricks, too!
Free webinar: Digital Badging in Music Education. What, Why and How!
Would you like to learn more about digital badging? Click here to access the free webinar Digital Badging in Music Education: What, Why and How!
About the writers

Katherine (Katie) Miller holds a Bachelor of Music in Education degree from Otterbein University (Westerville, OH) and a Masters of Educational Leadership from Antioch McGregor Midwest (Yellow Springs, OH). She has 15 years of professional musical experience as a music educator and performer.
She is currently employed by the School District of Waukesha in Waukesha, WI, where she teaches K-5 General Music and serves as a district model tech classroom. She was recognized in 2018 as a WPT Education Innovator by Wisconsin Public Television Education team. Twitter: K8TMiller

Alison Capelle is a music teacher at Bethesda Elementary, Waukesha, WI, USA. It is her 6th year in the School District of Waukesha and 16th year of teaching. She taught K-4 General Music for 10 years in the Howard-Suamico School District near Green Bay, WI. She received her Master’s Degree in Music Education with an emphasis in Orff Schulwerk from the University of St. Thomas in St. Paul, MN. As an educator, it is her goal to provide a positive learning environment in which students may experience all aspects of music, thus promoting lifelong advocacy for the musical arts. In her spare time, she enjoys singing, playing piano, reading, and spending time with her family.
